Thumbnailing Mini-Project
Description
In this project you will be given the XHTML code, image files, and empty CSS file for a half-completed image gallery. You are responsible for editing the images and XHTML as well as creating the CSS code. This project is due on Friday, September 10.
Inheriting a half-done project is a typical experience as a Web designer and developer. Often, clients will hire a cheap designer who only gets partly done, and when the client gets fed up with the slow and/or bad work, they find someone else. For this project, you are that someone else. View the half-finished project here.
Getting the Half-Done Project (Standard 4)
- Use "My Computer" to navigate to the Shared folders, Central Business, Nielsen, Web3-4
- Copy the "thumbnailing" folder into your "web folder" on your I: drive.
- Rename the thumbnailing folder so that your login name comes before "thumbnailing."
- View the index.html file in a Web browser to see what has been done.
- Also open the index file in Notepad to get ready for the next section.
Validating (Standard 4)
- Usually Web designers do not know who else worked on a Web site before it came to them. So the first thing to do is validate and make sure you have quality code to start from.
- Go to the W3Schools Validator.
- Click on the "Validate by File Upload" tab.
- Browse for the index file of your project and then click "Check."
- Notice there are errors. Start at the top of the list and try to fix them one at a time, revalidating after you fix each one.
- When all of the errors are fixed, move on to the next section.
Editing the Images (Standard 2)
- In your thumbnailing folder there are two image folders. One is for the originals (which are all present) and one for the thumbnails (which you are about to make).
- Choose a width for your thumbnail images. It can be between 100 and 300 pixels, and you may want to think about any other styles you are going to use when you pick the size.
- Open Photoshop.
- For ALL of the images in the original folder, do the following:
- Open the original image out of the "images_original" folder.
- Go to File, Save As... and save the image in the "images_thumb" folder.
- Now you are safe to edit the thumbnail without risking saving over the original.
- Crop the image to focus the visitor on the most important part of the picture.
- Resize the image so that it is the standard width you chose in step 2.
- Optional: Add an additional effect to all of your thumbnails that gives them a consistent look.
- Save.
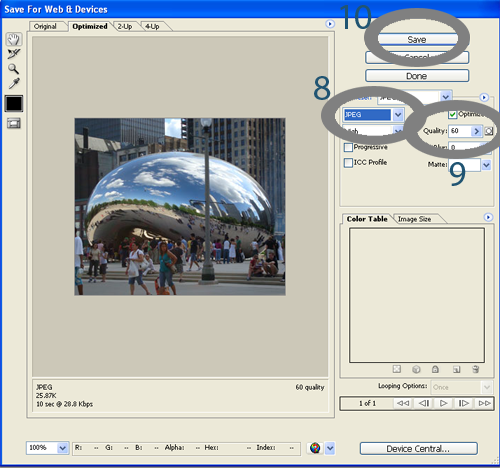
- Use File, Save for Web... and Select JPEG
- Use the quality slider to choose a quality that looks ok and has a good file size.
- Save. Go ahead and write over the current file.
- When this is done for ALL of the images, close Photoshop.
Re-Sourcing and Linking the Images (Standard 4)
- Open your index page for editing.
- Notice all of the <img> tags. Their source attribute has the path to the file, and it looks like "images_original/somefile.jpg"
- For each of those, change "images_original" to "images_thumb"
- Save. View the changes in a Web browser. Your thumbnails should now be showing instead of the original images.
- Let's link the thumbnails to their originals. For ALL images on the index page:
- Find the <img> tag. Around the image tag, place an anchor link tag (<a> tag).
- The href attribute of your <a> tag should have a value of "images_original/somefile.jpg"
- Save and view the changes in a Web browser.
- Test to make sure all of the images are linked to their originals.
- Re-validate your code. I expect your code to validate!
Styling (Standard 1)
- This page is very boring. Style it until it looks great!
- Here are some things I will be looking for:
- When you link an image, it automatically puts a blue border around the image. Change that border in some way to make it look better.
- Apply background styles that are appealing but not distracting away from the images.
- Apply color, font and text styles that make the page easy to read.
- The images and their captions are placed in convenient div elements. Use what you know about the box model to style them.
- (Hint on the box model: You may want to explore the "float" property of CSS.)
- You may have to edit the XHTML to reorganize the content a little bit before applying styles. Do so if necessary and re-validate.
- Styling is where I expect to be giving lots of Level 5 grades. Impress me with your designs!
Review Grading Rubrics (Standards 1,2,4)
- In your thumbnailing folder there is a Word doc called "grading_rubric"
- This file tells you exactly what I will be looking for to assign grades.
- I highly recommend that when you think you are done with your project, go into the rubrics and highlight the things you completed.
- Then you will know if you are missing anything that will hurt your grade.
- It will also give ideas for how to improve your grade.
- When you are absolutely sure that you are done with your project, turn it in by submitting to the shared folder.