Support Ticket Form Project

Part 1--Monday

File Management

  1. In your "forms" folder, create a new folder called "yourloginname support ticket"
  2. From your feedback form project, copy over the validate and livevalidate files into your "support ticket" folder.
  3. Create a new file called "ticket.html"

Create the Form

  1. We could use a template, but, when learning forms, you should practice writing at least one from scratch.
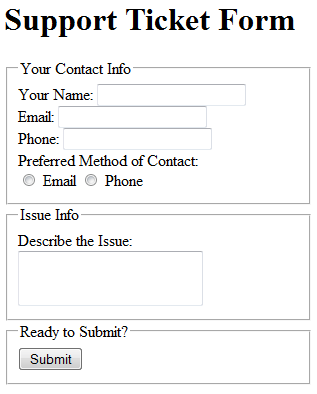
  2. In your "ticket.html" file, write the code that will creat the form below. (You can use your previous forms activities to copy-paste what you need.)
  3. first part of support ticket
  4. During development, make sure your form element has a method of "get" and an action that uses my form dumper.

Basic Validation

  1. When a user forgets to choose a contact method, instead of choosing for them, we should just make e-mail the default option to begin with.
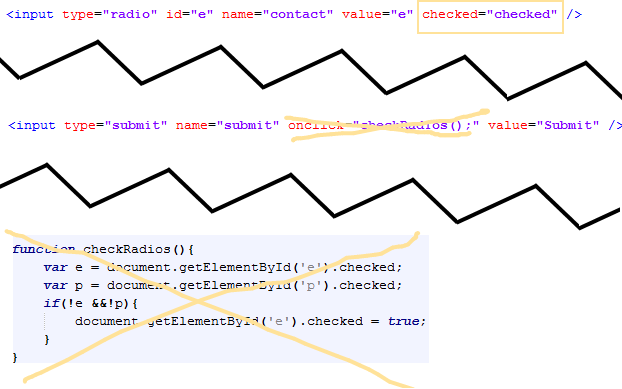
  2. To do this, add the attribute-value pair of checked="checked" to the appropriate form element. Then you can simply delete your checkRadios() function from both the submit button's onclick event and the validate definition.
  3. code changes for step 3
  4. The rest of the validation that you already wrote for the feedback form should still work for the contact info on this form.
  5. Test to be sure that the name field is required, and that e-mail and phone get properly formatted.
  6. Use the LiveValidation library to make the "Description" field required. Choose a minimum length that makes sense for describing a problem briefly.

Part 2--Tuesday & Wednesday

Dynamic Validaiton

  1. Here's a fun bit of logic: If someone selects e-mail as the preferred method of contact, then the e-mail field should be required.
  2. The same thing is true of the phone.
  3. We can represent this in the form itself with JavaScript.
  4. In the form, find your input elements for the email and phone contact methods.
  5. To them, add onclick events of "select_radio('e');" and "select_radio('p');"
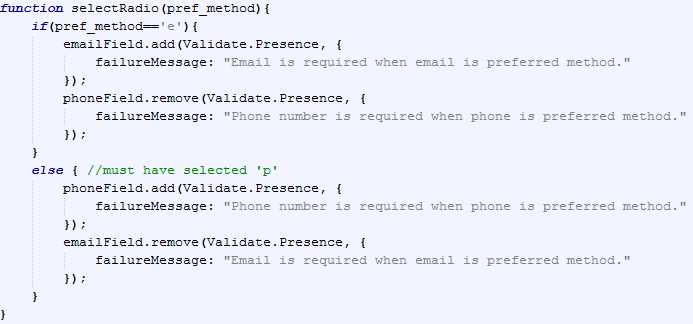
  6. Then add the following code to your JavaScript.
  7. dynamic validation code for the radios
  8. Save and test. Notice that when you click on the phone option, you get an error. Is says "phoneField is undefined"
  9. This is due to an advanced feature of programming languages called "scope." Since we defined the phoneField and emailField in the previous function, they are not accessible in this function.
  10. There are a couple of options to fix this. The easiest is to make those variables global, so we can access them anywhere. But global variables are kind of dangerous in most cases.
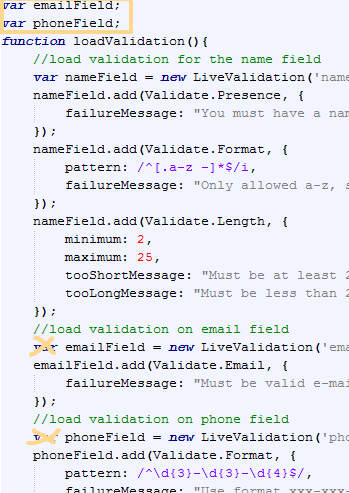
  11. Instead, we simply define the variables before we enter the function. In the code below, perform the indicated changes.
  12. code changes for scope issue
  13. Save and test. Now when you select a different contact method, the new one is required and other one is not.

Dynamic Form Elements

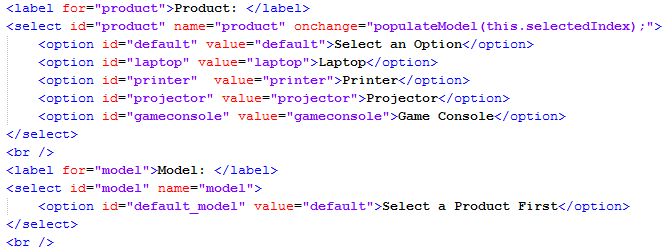
  1. Use the code below to add two special dropdown menus inside the "Issue" fieldset.
  2. code for dropdowns
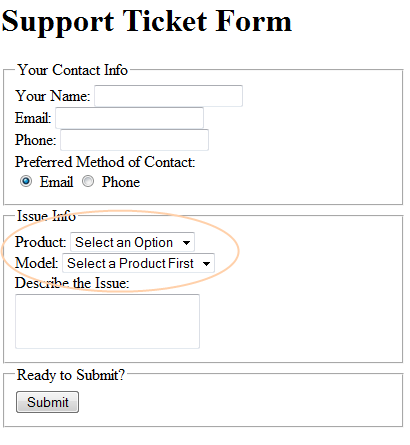
  3. Your form should now look like this.
  4. visual of the new dropdowns
  5. Notice that the second dropdown is pretty much empty. That's because the contents of the second one depend on the content of the first one.
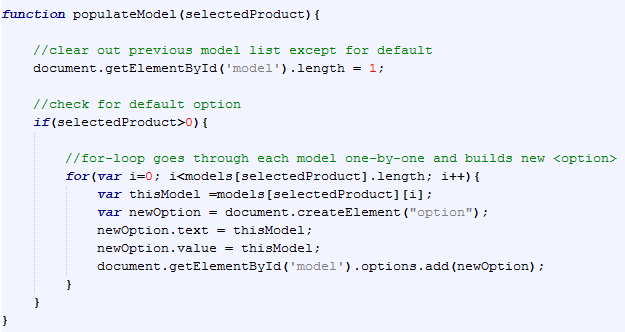
  6. We will populate the second one dynamically with JavaScript.
  7. In your validate file, add the following code.
  8. script that dynamically populates the second dropdown
  9. Save and test in a browser.

Part 3--Thursday and Friday

Extra usability:

  1. With the preferred method of contact, wouldn't it be nice if the e-mail radio was selected with you click on the word "email" next to it?
  2. Similarly with phone?
  3. Then remember your labels!
  4. If the id of your email contact radio button is "e" then you should have a <label for="e">Email<label> after it.
  5. Similarly for phone.
  6. Then save and test. You should be able to click on the word "Email" and the button for it will be selected. Same for phone.

Field Name Requirements

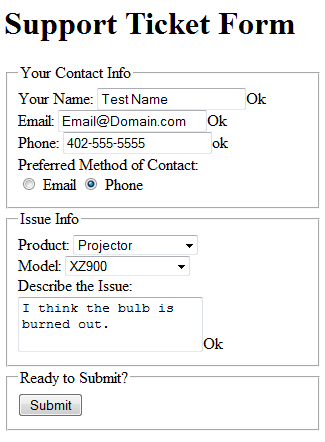
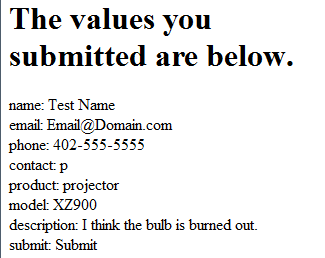
  1. The names and values of your fields determine what shows up in the form dumper.
  2. Make sure that when the form is filled out as below on the left, that it submits exactly like the results on the right.
  3. filled out form after submission
  4. Once it does that you can change the form so that it submits to the ticket log. Make the changes below in your form tag.
  5. changes to send the form to the log

Style

  1. Now it's time to pay special attention to design.
  2. Make sure that your form has directions that are clear and easy to understand.
  3. Make sure your validation produces error messages that are clear and easy to understand.
  4. Add style as you see fit to make the form look visually appealing while maintaining a clear and understandable look.

Part 4--Grading Rubrics

Standard 1: CSS

Level Requirements
3
  • The web page is enhanced in some way with CSS.
4
  • Do everything for level 3.
  • The web page uses background, color, and box model properties.
5
  • Do everything for level 4.
  • Impress me with something above and beyond! Extend what you've learned to show me something we haven't specifically discussed in class.
  • For example, research and implement ways to make form elements look nice with CSS styles.

Standard 3: Scripting

Level Requirements
3
  • The basic functionality is present (you followed along creating the validation and dynamic dropdowns from given code).
4
  • Do everything for level 3.
  • Validation is present on description/comment field.
5
  • Do everything for level 4.
  • Impress me with something above and beyond! Extend what you've learned to show me something we haven't specifically discussed in class.
  • For example, offer some kind of validation on the dropdown menus.

Standard 4: Build and Maintain Web Sites

Level Requirements
3
  • The Web page contains the dynamic dropdowns as shown in code sample.
  • The contact method has a default option checked.
4
  • Do everything for level 3.
  • The form has all required elements and submits successfully to the form log.
  • The instructions and error messages are all clear and easy to understand.
5
  • Do everything for level 4.
  • Impress me with something above and beyond! Extend what you've learned to show me something we haven't specifically discussed in class.
  • For example, use labels accurately for all form elements.