JavaScript Timers
Get the file:
- Open this file.
- Copy the contents into Notepad.
- Save your notepad as "timers_content.html" in your "javascript" folder.
- View the file in a Web browser.
- There are three main things to notice in the HTML: two span tags that hold content which we are going to change, and a button that will do something when we click it.
Create the External Script File
- In the <head> section of your HTML, add a script tag which references the JavaScript source file "timers_motion.js"
- Open a new instance of Notepad.
- Save your new notepad as "timers_content.js"
- Test that the link is correct by adding the line of code below into the JavaScript source file and testing the HTML page in the browser.
Create a Countdown
- Remove your test alert. That thing is annoying.
- Goal: We want a countdown of 5 seconds that shows an explosion when it's over.
- This countdown should start when the page is done loading. So we need to use an onload event. Add the following attribute-value pair to the body tag in your HTML.
- Notice that the onload event is a function call. It calls the function startCountdown, which we are about to define.
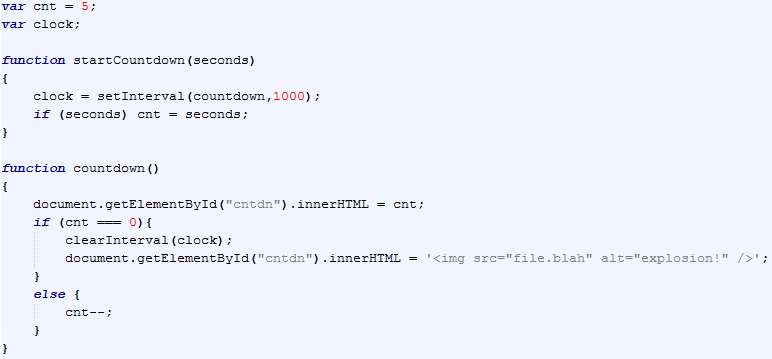
- Edit your JavaScript source file to include the following code.
- This is a lot of code, so take it one line at a time to understand.
- The first two lines are handy variables we will need. Obviously one is the number of seconds we are counting down. The other will be clear very soon.
- The contents of the "startCountdown" function (which is run at the onload event) begins the timer and checks to see if a different number of seconds was specified in the function call.
- Notice the use of the built-in "setInterval" function. Use the W3Schools Web site to look up information about how to use the interval functions.
- The contents of the "countdown" function definition show the new countdown on the page, checks to see if the countdown is finished, and reduce the countdown.
- If the countdown is finished, it clears the interval and puts an image in the page instead of a number.
- This image doesn't exist yet. Let's go find a good one with Google Image Search. Remember to filter by labeled for reuse!
Create a Timed Response
- Goal: We want a response to occur after a random period of time from clicking the button on the page.
- This means our first line of code will be in the onclick event of the button, so make sure your HTML file is open in Notepad.
- Find the <input> tag which is the button. Add an onclick event using the attribute-value pair below:
- This code instructs the browser to run the function named "timedResponse" so let's go write that next. Add the code below to your JavaScript file.
- The first line inside the function determines a random amount of time to wait up to five seconds.
- The next line is a message to be displayed after the wait time.
- The last line in the function uses the built-in function setTimeout actually makes the browser wait before adjusting the message on the page.
- Notice: the "setTimeout" function takes two parameters: the code to be run, and the time to wait.
- Find the setTimeout function at the W3Schools and verify that we are using it properly.
- Test the code in your browser.